Needlebook finishing instructions
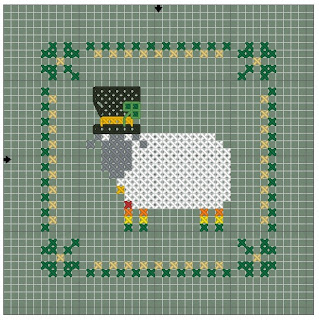
Step One: Stitch the motif in cross stitch, starting from the center of the chart.
Step Two: Stitch the frame around the design in back stitch. You will be using this design to apply the finished stitching to the front of the needlebook.
Step Three: Cut out your motif with a 3/8" margin around all edges.
 Locate the top right corner. Use a pin stitch or knot to secure your thread to the fabric.
 Fold over the top corner of your motif. Either hold or securely pin your motif to the wool fabric so the corner looks as shown. Using your needle come up from the rear of the wool through each of the back stitches to secure the design to the wool.

 Continue around all 4 sides in the same manner, pinning and tucking edges as you go.


 Once your design is fully secured to the front of the wool, use a reverse chain stitch to attach the needlekeep fabric to the book.
 Position the wool. You can pin it in place if you wish.
 Make a single running stitch, then a chain stitch below it, coming up through the running stitch.
 Continue chain stitching, passing the thread behind the previous chain.
 Using a blanket stitch, case the edge of your pocket fabric.
 Pin the pocket fabric to the book, and using blanket stitch continue to case the entire edge of the needlebook.
 And that's all there is to it! Happy stitching, enjoy your new accessory!


Step Two: Stitch the frame around the design in back stitch. You will be using this design to apply the finished stitching to the front of the needlebook.
Step Three: Cut out your motif with a 3/8" margin around all edges.


Comments
Post a Comment