Stitch a Long Instructions & Finish Guide
Stitches Used:
Whole Cross Stitch
Half Cross Stitch
Straight Stitch
2 Strands are used for all stitches. Work whole stitches first, then straight and half stitches.
Materials:
8 x 8 piece of 14ct Aida
1 Skein of each Color floss
1 Spool Kreinik Gold Blending Filament
10 9mm Split Rings
8 x 8 square of 3 different fabrics for sides
8 x 8 square of a heavier fabric for base (felt, flannel or denim work great)
17 x 7 piece of light weight batting
2" sticky-backed hook & loop tape
1 11 x 14" piece pf heavy duty poster board, folded in half
2 oz poly pellets
2 oz poly-fil stuffing
FOR EXTRA BLING
On rows 33 and 55 add 1 thread of Kreinik Gold to your 2 strands of floss and stitch.
All other bling-added stitches on the model use 2 strands of Kreinik Gold.
Never used Kreinik to add extra depth to a project? Watch this handy video from Kreinik HERE
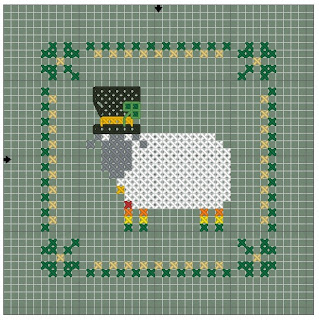
Locate the center of your fabric and mark it with either a water soluble pen or basting thread. I found it was easier to work this pattern from the top down, adding each row as I went down the pattern. You may use whatever technique works for you.
CHALLENGE STITCH
Instead of doing half stitches of each color on the center row, try a needle weave! Thread your needle with 2 strands of Kreinik then add your floss. Work all of the green from left to right. Go back and weave in the blue going over under over under as you stitch. See the photo on the Stitch-a-Long page for reference.
FINISHING INSTRUCTIONS
To make the stitch buddy:
Cut out the triangle template and the base. You will need to cut out the inside of the triangle template to make centering your design easier. With your design centered in the template, pin the sides to your fabric.

Trace the outer edge of the template with a water soluble pen. Unpin the template. Turn your piece over. (Ignore that there are pins in the picture below, I took them off right after this, I swear!!)

OPTIONAL Treat the edges of your needlework with fray lock. I do this on all of my pieces, but it's up to you whether to skip this step or not. I know this stitch buddy will be getting used a lot so I like the added security. If you use a needlework finishing product on the back of your pieces this is a good time to apply this as well. Let cure.
 While that's drying let's cut out our other bits & pieces. You will be tracing both the inner and outer parts of the template for the FABRIC, and only the INNER dimension for the LINING.


Start by applying the split rings to the top of one side of the pyramid, being careful to stay within the area of the batting. Center your first ring 1/2" from the top and 1/2 inch from either side.
Use a whip stitch to attach. I used 5 stitches at the TOP of the ring only. These are meant to be floss holders, so you want ONLY THE TOP attached to the fabric.


Whole Cross Stitch
Half Cross Stitch
Straight Stitch
2 Strands are used for all stitches. Work whole stitches first, then straight and half stitches.
Materials:
8 x 8 piece of 14ct Aida
1 Skein of each Color floss
1 Spool Kreinik Gold Blending Filament
10 9mm Split Rings
8 x 8 square of 3 different fabrics for sides
8 x 8 square of a heavier fabric for base (felt, flannel or denim work great)
17 x 7 piece of light weight batting
2" sticky-backed hook & loop tape
1 11 x 14" piece pf heavy duty poster board, folded in half
2 oz poly pellets
2 oz poly-fil stuffing
FOR EXTRA BLING
On rows 33 and 55 add 1 thread of Kreinik Gold to your 2 strands of floss and stitch.
All other bling-added stitches on the model use 2 strands of Kreinik Gold.
Never used Kreinik to add extra depth to a project? Watch this handy video from Kreinik HERE
Locate the center of your fabric and mark it with either a water soluble pen or basting thread. I found it was easier to work this pattern from the top down, adding each row as I went down the pattern. You may use whatever technique works for you.
CHALLENGE STITCH
Instead of doing half stitches of each color on the center row, try a needle weave! Thread your needle with 2 strands of Kreinik then add your floss. Work all of the green from left to right. Go back and weave in the blue going over under over under as you stitch. See the photo on the Stitch-a-Long page for reference.
FINISHING INSTRUCTIONS
To make the stitch buddy:
Cut out the triangle template and the base. You will need to cut out the inside of the triangle template to make centering your design easier. With your design centered in the template, pin the sides to your fabric.

Trace the outer edge of the template with a water soluble pen. Unpin the template. Turn your piece over. (Ignore that there are pins in the picture below, I took them off right after this, I swear!!)

OPTIONAL Treat the edges of your needlework with fray lock. I do this on all of my pieces, but it's up to you whether to skip this step or not. I know this stitch buddy will be getting used a lot so I like the added security. If you use a needlework finishing product on the back of your pieces this is a good time to apply this as well. Let cure.


I like to fussy cut the patterned fabric, but this is your decision.
Cut 1 of each of the other colored fabrics for a total of 3 pieces.

Using the interior dimension of the triangle, cut the lining. Use a repositionable spray adhesive on one side of these pieces. Apply them to your fabric pieces and allow to cure. This is a good point to stop as Fray Lock usually takes 8 hours to cure.

Once everything has cured we can start assembly.


Use a whip stitch to attach. I used 5 stitches at the TOP of the ring only. These are meant to be floss holders, so you want ONLY THE TOP attached to the fabric.
Next, apply the fuzzy side of the hook & loop to the other plain fabric.

Use a sewing machine with a 3/8" seam to piece together your three sides, right sides together, stopping and starting at the edges of the batting. Do not continue your seams to the edges of the fabric for ease of assembly.
Next you will add the needlework to the other 2 sides using either your sewing machine or hand stitch if you prefer, pinning and sewing right side to right side. You should now have an inside out shape like this:

Cut out the square base.
Piece the base to 3 of the bottom sides of the pyramid leaving the side of your needlework open.
Turn the pyramid right side out.
Pour in the poly-pellets, followed by the fiber fill. Whip stitch the opening closed.
Next: Place the hook side of the hook and loop tape onto the fuzzy side with the sticky side revealed.
Place your folded poster board, fold against the table, centered against the pyramid to apply the hook tape to it.

Unfold the poster board and place it under your pyramid and.......

VOILA!
Grab a pattern, some floss and paper clips and you are ready to go!